
![Featured image for [Spring] Spring Web Application의 동작 원리](https://tired-i.com/wp-content/uploads/2026/01/spring-spring-w-image.png)
이 글에서는 예전에 포스팅한 “[Spring] 클라이언트의 요청이 처리되는 과정”에서 다룬 Spring 프로젝트가 초기화되는 과정을 보다 깊이 알아보았다.
1. 3 layered architecture
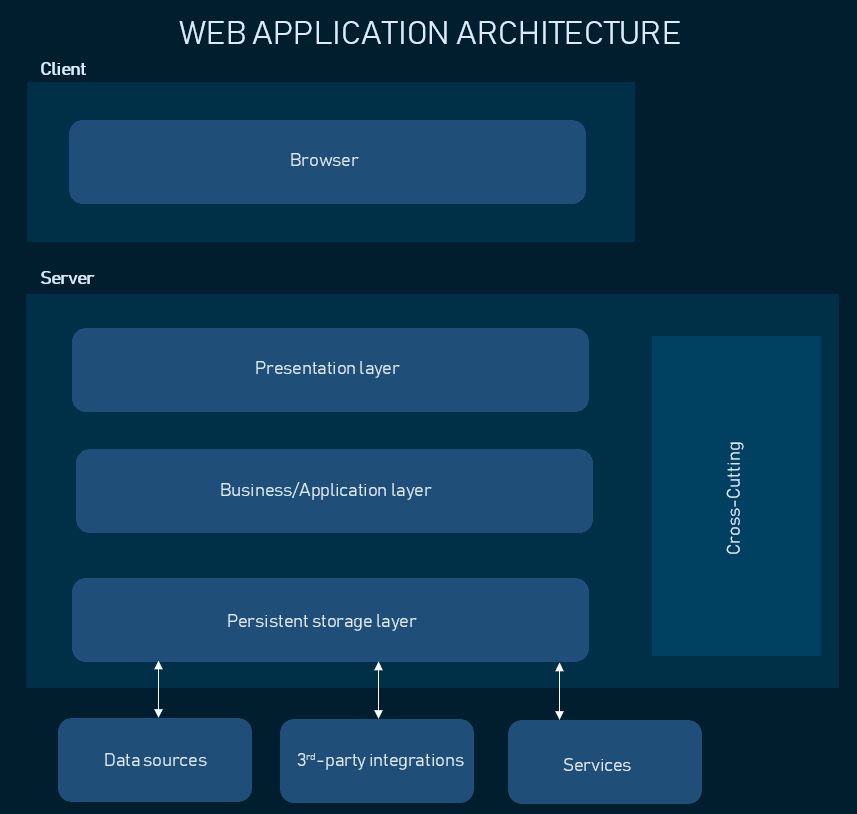
애플리케이션을 3개의 논리적 및 물리적 컴퓨팅 계층으로 분리하는 3 계층 아키텍처는 기존의 클라이언트 서버 애플리케이션을 위한 주요 소프트웨어 아키텍처다.
기능의 논리적 및 물리적 분리가 가능하다.
3계층 아키텍처는 애플리케이션을 3개의 논리적이고 물리적인 컴퓨팅 계층으로 구성하는 확립된 소프트웨어 애플리케이션 아키텍처다.
| 계층 | 설명 | 사용 기술 |
| Presentation layer | 사용자 인터페이스 | HTML, CSS, JavaScript |
| Business/Application layer | 프레젠테이션 계층에서 수집된 정보를 비즈니스 로직으로 처리 | Python, Java, Perl, PHP, Ruby 등 |
| Persistent storage layer | 애플리케이션이 처리하는 정보가 저장 및 관리되는 곳 | 관계형 데이터베이스 또는 NoSQL 데이터베이스 서버 |
2. Spring Web Application의 동작 원리
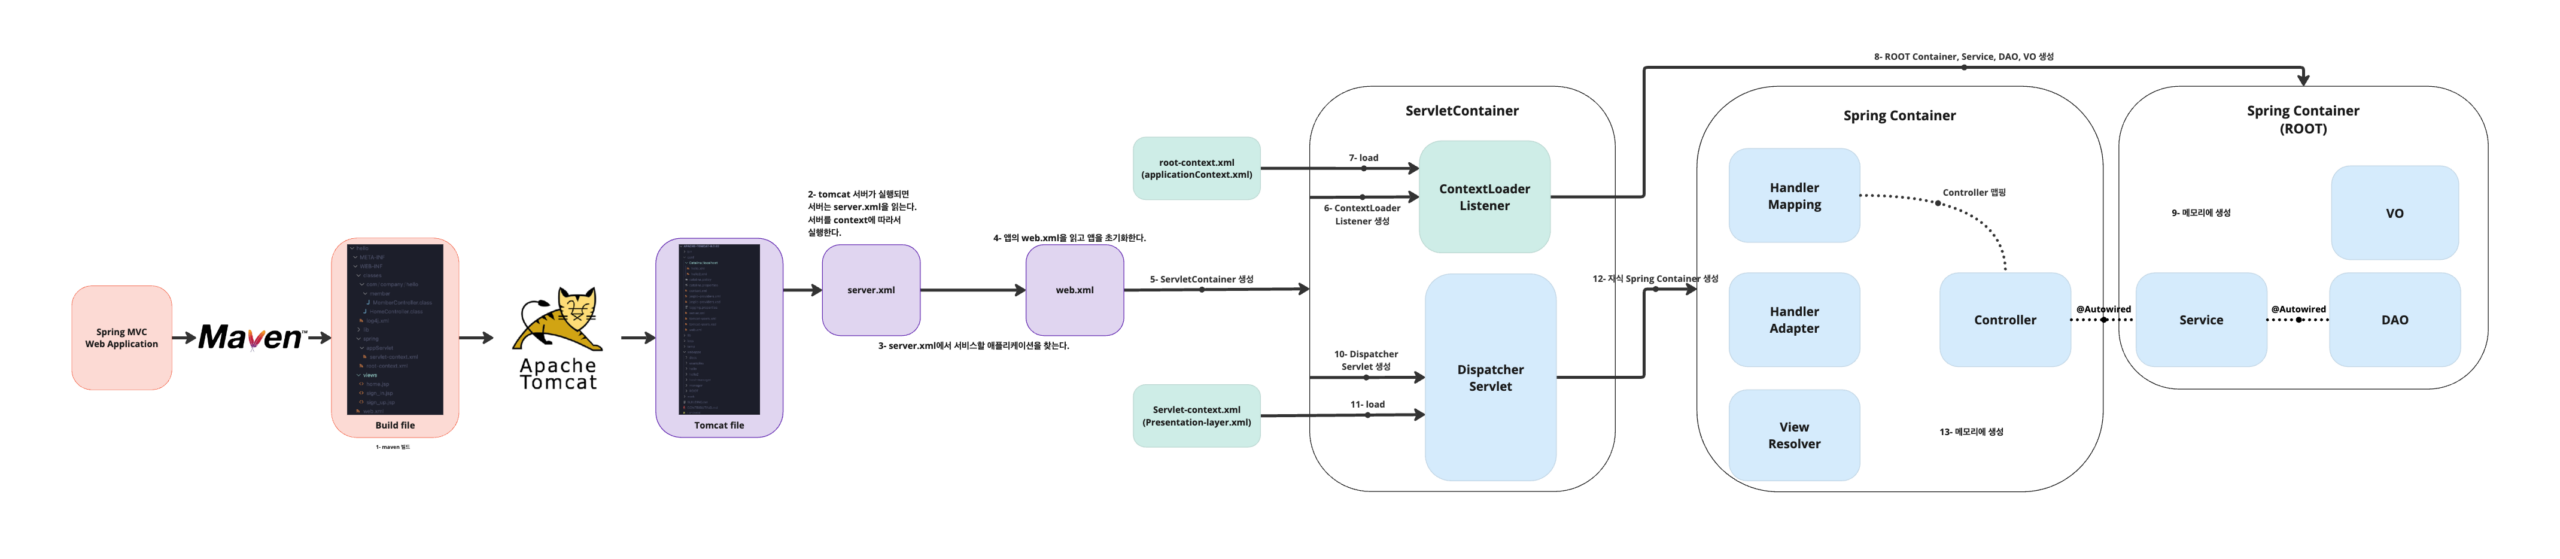
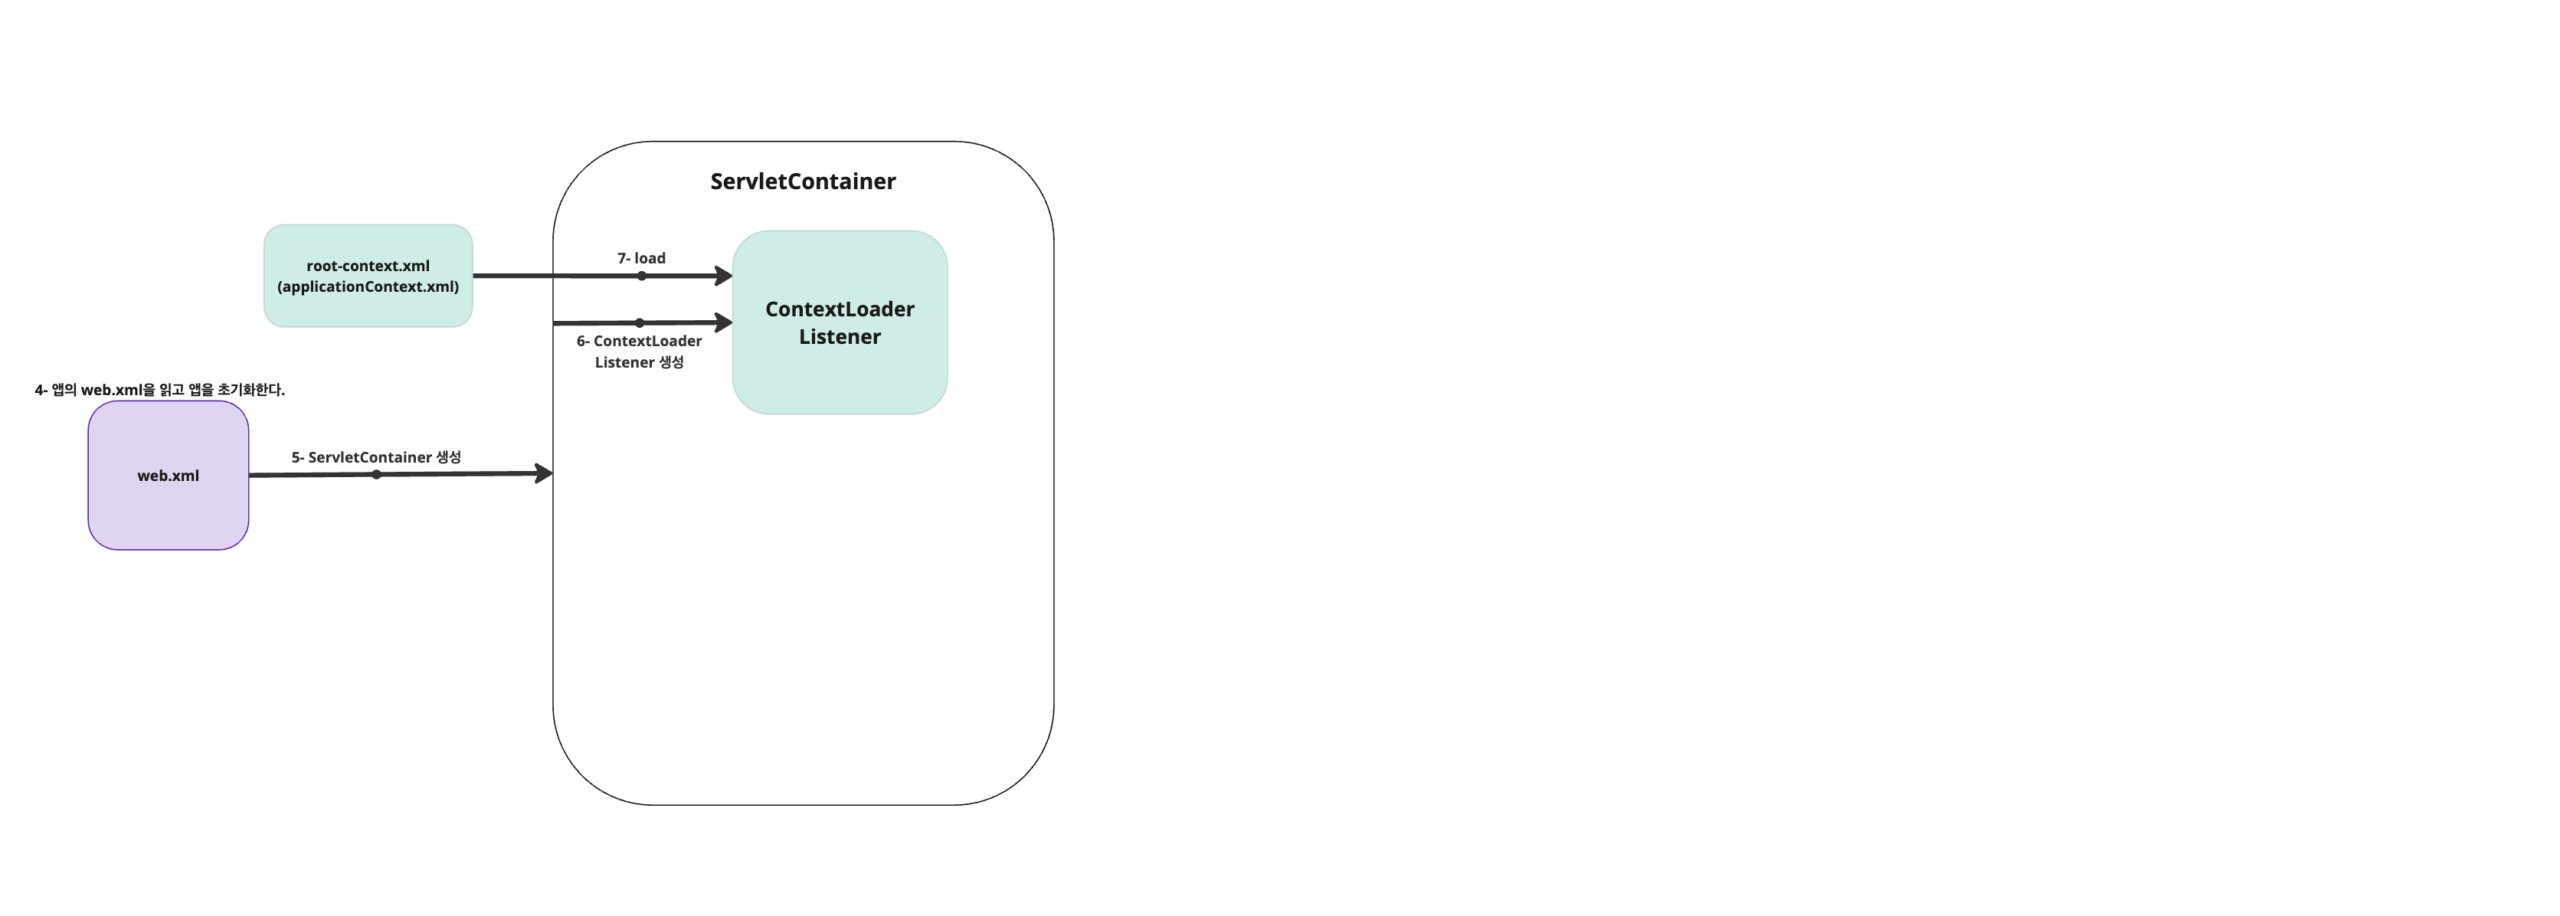
Tomcat은 server.xml > META-INF > WEB-INF 순서로 읽는다.
WEB-INF 안에 있는 파일들은 web.xml > root-context.xml > servlet-context.xml > … 순으로 읽는다.
- 웹 어플리케이션이 실행되면 Tomcat(WAS)에 의해
web.xml이 loading된다. web.xml에 등록된ContextLoaderListener생성.ContextLoaderListner클래스는ServletContextListeninterface를 구현하고 있으며,ApplicationContext를 생성하는 역할을 수행한다.- 생성된
ContextLoaderListener는root-context.xml을 loading. root-context.xml에 등록되어 있는Spring Container(=Root Container)가 구동. 이때 개발자가 작성한 Business Logic(Service)에 대한 부분과 Database Logic(DAO) 객체들이 생성됨.DispatcherServlet이 생성됨.DispatcherServlet은servlet-context.xml을 loading.- 두 번째
Spring Container(= 자식 Container)가 구동되며 응답에 맞는Controller들이 동작. DispatcherServlet은 Client로부터 온 요청 메시지를 분석하여 알맞은Controller에게 전달.Controller는 응답을 받아Service와DAO와 협업하여 요청을 처리.
3. web.xml
<?xml version="1.0" encoding="UTF-8"?>
<web-app xmlns:xsi="http://www.w3.org/2001/XMLSchema-instance"
    xmlns="https://jakarta.ee/xml/ns/jakartaee"
    xsi:schemaLocation="https://jakarta.ee/xml/ns/jakartaee https://jakarta.ee/xml/ns/jakartaee/web-app_6_0.xsd"
    id="WebApp_ID" version="6.0">

    <!-- The definition of the Root Spring Container shared by all Servlets and Filters -->
    <context-param>
        <param-name>contextConfigLocation</param-name>
        <param-value>/WEB-INF/spring/root-context.xml</param-value>
    </context-param>

    <!-- Creates the Spring Container shared by all Servlets and Filters -->
    <listener>
        <listener-class>org.springframework.web.context.ContextLoaderListener</listener-class>
    </listener>

    <!-- POST 방식의 한글 처리. -->
     <!-- <filter>
        <filter-name>encodingFilter</filter-name>
        <filter-class>org.springframework.web.filter.CharacterEncodingFilter</filter-class>
        <init-param>
          <param-name>encoding</param-name>
          <param-value>UTF-8</param-value>
        </init-param>
     </filter>

     <filter-mapping>
        <filter-name>encodingFilter</filter-name>
        <url-pattern>/*</url-pattern>
     </filter-mapping> -->

    <!-- Processes application requests -->
    <servlet>
        <servlet-name>appServlet</servlet-name>
        <servlet-class>org.springframework.web.servlet.DispatcherServlet</servlet-class>
        <init-param>
            <param-name>contextConfigLocation</param-name>
            <param-value>/WEB-INF/spring/appServlet/servlet-context.xml</param-value>
        </init-param>
        <!-- DispatcherServlet이 해당 mapping을 찾지 못할 경우 NoHandlerFoundException를 throw하게 설정 -->
        <init-param>
            <param-name>throwExceptionIfNoHandlerFound</param-name>
            <param-value>true</param-value>
        </init-param>
        <load-on-startup>1</load-on-startup>
    </servlet>

    <servlet-mapping>
        <servlet-name>appServlet</servlet-name>
        <url-pattern>/</url-pattern>
    </servlet-mapping>

</web-app>
Code language: HTML, XML (xml)
<!-- Creates the Spring Container shared by all Servlets and Filters -->
<listener>
<listener-class>org.springframework.web.context.ContextLoaderListener</listener-class>
</listener>
Code language: HTML, XML (xml)web.xml의 ContextLoaderLinstener는 웹 애플리케이션의 context가 로딩되는 이벤트를 리스닝한다.
<!-- The definition of the Root Spring Container shared by all Servlets and Filters -->
<context-param>
    <param-name>contextConfigLocation</param-name>
    <param-value>/WEB-INF/spring/root-context.xml</param-value>
</context-param>
Code language: HTML, XML (xml)<context-param>은 웹 애플리케이션의 전체 콘텍스트 설정 정보를 담고 있다.
ContextLoaderLinstener는 root-context.xml을 읽도록 한다.
4. root-context.xml

root-context.xml 파일은 Root Spring Container의 context를 정의하는 곳이다.
root-context.xml을 읽은 후 모든 Servlet과 Filter에서 접근할 수 있는 Root Spring Container를 생성한다.
root-context.xml에서 생성하는 Root Spring Container은 비 웹 요소로 주로 개발자가 작성한 Business Logic(Service)에 대한 부분과 Database Logic(DAO) 부분들이다.
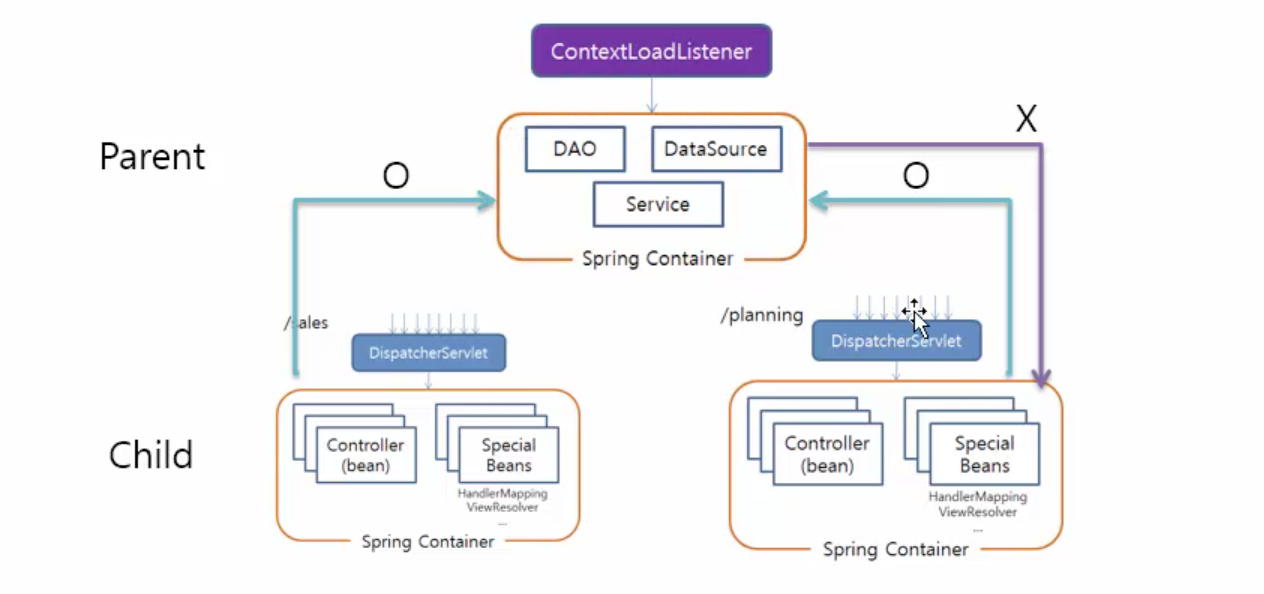
Root Spring Container는 모든 서블릿과 필터가 공유한다.
<?xml version="1.0" encoding="UTF-8"?>
<beans xmlns="http://www.springframework.org/schema/beans"
xmlns:xsi="http://www.w3.org/2001/XMLSchema-instance"
xmlns:context="http://www.springframework.org/schema/context"
xmlns:aop="http://www.springframework.org/schema/aop"
xsi:schemaLocation="http://www.springframework.org/schema/beans https://www.springframework.org/schema/beans/spring-beans.xsd
http://www.springframework.org/schema/context http://www.springframework.org/schema/context/spring-context-4.3.xsd
http://www.springframework.org/schema/aop http://www.springframework.org/schema/aop/spring-aop-4.3.xsd">
<!-- Root Context: defines shared resources visible to all other web components -->
<context:component-scan base-package="com.company.*.model,com.company.util,com.company.board.aop"/>
<aop:aspectj-autoproxy/>
<bean id="dataSource" class="org.springframework.jdbc.datasource.SimpleDriverDataSource">
<property name="driverClass" value="com.mysql.cj.jdbc.Driver"/>
<property name="url" value="jdbc:mysql://127.0.0.1:3306/companyweb?serverTimezone=UTC&useUniCode=yes&characterEncoding=UTF-8"/>
<property name="username" value="company"/>
<property name="password" value="company"/>
</bean>
</beans>
Code language: HTML, XML (xml)<context:component-scan base-package="..."/>
: IoC 컨테이너가 지정된 패키지 내부의 클래스들 중에서 Bean으로 등록할 클래스를 찾아 등록한다.<aop:aspectj-autoproxy/>: 관점 지향 프로그래밍(AOP)을 자동으로 지원하게 해 줍니다.<bean id="dataSource" …></bean>: DB connection을 위한 Bean.
5. servlet-context.xml
<?xml version="1.0" encoding="UTF-8"?>
<beans:beans xmlns="http://www.springframework.org/schema/mvc"
    xmlns:xsi="http://www.w3.org/2001/XMLSchema-instance"
    xmlns:beans="http://www.springframework.org/schema/beans"
    xmlns:context="http://www.springframework.org/schema/context"
    xsi:schemaLocation="http://www.springframework.org/schema/mvc https://www.springframework.org/schema/mvc/spring-mvc.xsd
        http://www.springframework.org/schema/beans https://www.springframework.org/schema/beans/spring-beans.xsd
        http://www.springframework.org/schema/context https://www.springframework.org/schema/context/spring-context.xsd">

    <!-- DispatcherServlet Context: defines this servlet's request-processing infrastructure -->

    <!-- Enables the Spring MVC @Controller programming model -->
    <annotation-driven />

    <!-- Handles HTTP GET requests for /resources/** by efficiently serving up static resources in the ${webappRoot}/resources directory -->
    <!-- <resources mapping="/resources/**" location="/resources/" /> -->
    <!-- <resources mapping="/img/**" location="/resources/img/" />
    <resources mapping="/css/**" location="/resources/css/" />
    <resources mapping="/js/**" location="/resources/js/" /> -->
    <resources mapping="/assets/**" location="/resources/assets/" />

    <!-- Resolves views selected for rendering by @Controllers to .jsp resources in the /WEB-INF/views directory -->
    <beans:bean class="org.springframework.web.servlet.view.InternalResourceViewResolver">
        <beans:property name="prefix" value="/WEB-INF/views/" />
        <beans:property name="suffix" value=".jsp" />
    </beans:bean>

    <context:component-scan base-package="com.company.*.controller" />

</beans:beans>
Code language: HTML, XML (xml)servlet-context.xml을 로딩하기 앞서 Controller에 관한 context를 먼저 읽어 들이면 안 된다.
HandlerMapping의 생성은 servlet-context.xml의 <annotation-driven/> 부분과 관련 있다.
매핑 정보를 저장할 HandlerMapping이 생성되기 전에 Controller에 관한 context를 읽어 들이면 정상적으로 매핑되지 않는 듯하다.
@RequestMapping(), @GetMapping(), @PostMapping() 등 매핑 정보를 HandlerMapping에 저장하기 위해서 Controller에 관한 context를 servlet-context.xml보다 빨리 읽으면 안 된다.
다른 Service나 DB Connection Pool은 root-context.xml에 등록하고 DispatcherServlet을 만들기 전에 생성해도 된다.
하지만 Controller만큼은 servlet-context.xml에서 등록하자.

7. Controller
가. Parameter Type
Controller에서 입력받을 수 있는 Parameter Type들:
| Parameter Type | 설명 |
| HttpServletRequest | 클라이언트 요청 정보를 갖고 있는 객체 |
| HttpServletResponse | 클라이언트 응답 정보를 갖고 있는 객체 |
| HttpSession | 세션 정보를 갖고 있는 객체 |
| Map, Model, ModelMap | 뷰에 전달할 데이터를 담는 객체 |
| @PathVariable | URL 경로에 포함된 값을 가져오는데 사용 |
| @RequestParam | 요청 파라미터 값을 가져오는데 사용 |
| @RequestBody | HTTP 요청의 Body 부분을 자바 객체로 변환해서 사용 |
| @RequestHeader | HTTP 요청 헤더 값을 가져오는데 사용 |
| @SessionAttribute | 특정 세션에 존재하는 값을 가져오는데 사용 |
| @CookieValue | 쿠키의 값을 가져오는데 사용 |
| 커스텀 DTO | 사용자가 정의한 데이터 전송 객체 |
| Java.util.Locale | 현재 요청에 대한 Locale |
| InputStream, Reader | 요청 본문을 읽는 데 사용 |
| OutputStream, Writer | 응답 본문을 쓰는 데 사용 |
나. @RequestMapping Options
@RequestMapping(), @GetMapping(), @PostMapping()의 옵션들.
| Option | Description | Example |
| value | URL을 지정합니다. 가장 많이 사용하는 옵션입니다. | @RequestMapping(value=”/home”) |
| method | HTTP 요청 방식을 지정합니다. GET, POST, PUT, DELETE 등을 지정할 수 있습니다. | @RequestMapping(value=”/home”, method=RequestMethod.GET) |
| params | 요청 파라미터의 조건을 지정합니다. 특정 파라미터가 있거나 없거나, 특정 값과 일치하거나 일치하지 않아야합니다. | @RequestMapping(value=”/home”, params=”type=member”) |
| headers | 요청 헤더의 조건을 지정합니다. 특정 헤더가 있거나 없거나, 특정 값과 일치하거나 일치하지 않아야합니다. | @RequestMapping(value=”/home”, headers=”content-type=text/*”) |
| consumes | 요청의 컨텐츠 타입을 지정합니다. | @PostMapping(value=”/home”, consumes = “application/json”) |
| produces | 응답의 컨텐츠 타입을 지정합니다. | @GetMapping(value=”/home”, produces = “application/json”) |
다. Model & View
1) ModelAndView를 생성해서 ModelAndView를 반환하는 방법:
@GetMapping("/foo")
public ModelAndView foo() {
    ModelAndView mav = new ModelAndView();
    mav.addObject("msg", "안녕하세요");
    mav.setViewName("foo");
    return mav;
}
Code language: PHP (php)
2) Model을 매개변수로 받고 View를 String으로 반환.
@GetMapping("/foo1")
public String foo1(Map<String, Object> model) {
    model.put("msg", "안녕하세요");
    return "foo1";
}

@GetMapping("/foo2")
public String foo2(Model model) {
    model.put("msg", "안녕하세요");
    return "foo2";
}

@GetMapping("/foo3")
public String foo3(ModelMap model) {
    model.put("msg", "안녕하세요");
    return "foo3";
}
Code language: JavaScript (javascript)
모델은 Model, Map, ModelMap 등으로 argument로 받을 수도 있다.
foo2()번이 짧아서 많이 사용된다.
3) Map 파라미터 주의점
// QueryString
@GetMapping("/")
public String hello(@RequestParam Map<String, Object> map){...}

// Model
@GetMapping("/")
public String hello(Map<String, Object> model){...}

// 모두 Model이 된다!!!!
@GetMapping("/")
public String hello(Map<String, Object> map){...}
@GetMapping("/")
public String hello(Map<String, Object> map1){...}
@GetMapping("/")
public String hello(Map<String, Object> map2){...}
@GetMapping("/")
public String hello(Map<String, Object> map3){...}
Code language: JavaScript (javascript)
@RequestParam tag가 있는 Map은 Model이 아니다.
QueryString에 대한 정보를 가지고 있는 객체다.
조심하자!